Rainbow Six Siege - це чудовий тактичний багатокористувацький шутер, розроблений та виданий Ubisoft. Основна увага приділяється знищенню довкілля та співпраці між членами команди, але багато користувачів не змогли скористатися тактичною перевагою використання голосового чату, оскільки він просто не працює в грі.

Протягом багатьох років гравців застосовували багато різних методів, щоб вирішити проблему, і ми вирішили зібрати найбільш корисні та надати покрокові інструкції. Уважно дотримуйтесь їх нижче, і проблема повинна бути усунена в найкоротші терміни!
Що призводить до того, що голосовий чат не працює в Rainbow Six Siege?
Ця проблема має досить довгий перелік можливих причин, які можна віднести до неї. Рекомендуємо перевірити причини, щоб визначити ваш сценарій і, можливо, вирішити проблему швидше, ніж зазвичай. Ознайомтесь із повним списком нижче!
- Немає пристрою запису за замовчуванням - На вашому комп’ютері за замовчуванням потрібно вибрати один запис. Це сигналізуватиме гру, до якого пристрою слід отримати доступ, і проблема повинна перестати з’являтися.
- Проблеми з антивірусом - деякі антивірусні інструменти можуть перешкоджати грі отримати доступ до вашого обладнання, і, можливо, вам доведеться додати його до списку винятків, щоб вирішити проблему.
- Звукові драйвери - встановлені на даний момент звукові драйвери можуть бути занадто старими або пошкодженими. Це може спричинити всілякі проблеми зі звуком, і ми настійно рекомендуємо якнайшвидше їх оновити.
- Asus Sonic Studio - це програма, яка, як повідомляється, не працює належним чином разом із налаштуваннями голосового чату гри, тому ми рекомендуємо просто видалити її, якщо ви не залежате від неї.
- DNS-адреса - це може здатися дивним, але зміна DNS-адреси за замовчуванням, яку використовує ваш комп’ютер, вдалося вирішити проблему для багатьох користувачів!
Рішення 1: Виберіть пристрій запису за замовчуванням
Багато користувачів повідомляють, що проблема була спричинена тим, що жоден пристрій не було вибрано як пристрій запису за замовчуванням. Ви можете вирішити це досить легко, і саме це робить цей метод таким корисним. Це займе лише хвилину, і вона має великий шанс вирішити вашу проблему в одну мить. Виконайте наведені нижче дії, щоб вибрати пристрій запису за замовчуванням!
- Клацніть правою кнопкою миші значок динаміків у нижній правій частині екрана. Він розташований у системному треї в правій частині панелі завдань. Виберіть Звуки з контекстного меню, яке з’явиться.

- Крім того, ви можете використовувати комбінацію клавіш Win + R, щоб відкрити діалогове вікно « Виконати» . Усередині вікна введіть “ control ” і натисніть кнопку OK, щоб відкрити Панель управління . Ще простіше, ви можете просто шукати Панель керування з відкритим меню «Пуск».
- Опинившись на Панелі керування, змініть параметр « Перегляд за» на « Великий» або «Маленький» у верхній правій частині екрана. Прокрутіть вниз, поки не дійдете до опції Звуки всередині. Клацніть лівою кнопкою миші, щоб відкрити його.

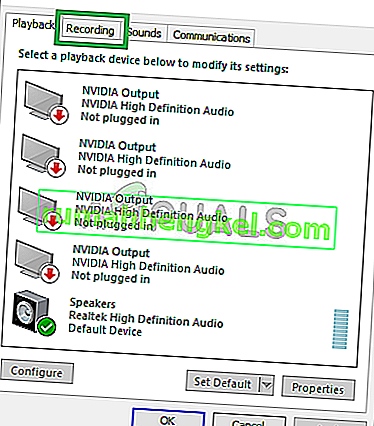
- У будь-якому випадку перейдіть на вкладку Запис у вікні Звук і знайдіть свій основний пристрій запису. Він повинен мати зелену галочку в нижній правій частині піктограми. Клацніть лівою кнопкою миші, щоб вибрати його, і натисніть кнопку Встановити за замовчуванням нижче. Натисніть OK, щоб підтвердити зміни та перевірити, чи починає працювати голосовий чат у Rainbow Six Siege!
Рішення 2. Додайте Rainbow Six Siege як виняток у свій антивірус
Користувачі повідомляли про наявність антивірусних проблем щодо гри. Звичайно, гра не шкідлива, але це досить важко довести програмному забезпеченню. Однак видалення цього має бути крайнім заходом. До цього ви можете додати виняток для виконуваного файлу гри або папки, і ваш антивірус повинен дозволяти це протягом кожного запуску. Виконайте наведені нижче дії та перевірте, чи вдалося це вирішити вашу проблему!
- Відкрийте антивірусний клієнт , двічі клацнувши його піктограму, доступну в системному треї (права частина панелі завдань внизу вікна), або здійснивши пошук у меню « Пуск» або після відкриття пошуку / Кортани.
- Варіант Винятки чи Виключення знаходиться в різних місцях, коли мова йде про різні антивірусні засоби. Його часто можна легко знайти без особливих клопотів, але ось кілька швидких кроків щодо того, як знайти його в найпопулярніших сторонніх антивірусних інструментах:
Kaspersky Internet Security : Домашня сторінка >> Налаштування >> Додаткові >> Загрози та виключення >> Виключення >> Вкажіть надійні програми >> Додати.

AVG : Головна >> Налаштування >> Компоненти >> Web Shield >> Винятки.

Avast : Головна >> Налаштування >> Загальне >> Виключення.

- Вам потрібно буде додати виконуваний файл або папку Rainbow Six Siege у вікно, яке з’явиться, що запропонує перейти до гри. Виконуваний файл повинен знаходитися в тій же папці, де ви вирішили встановити гру. За замовчуванням це:
C: \ Program Files (x86) \ Steam \ steamapps \ common
- Перевірте, чи можете ви зараз грати у гру та правильно використовувати голосовий чат. Якщо це все одно не працює, спробуйте перезавантажити комп’ютер і повторіть спробу. Останнім кроком було б видалити антивірус та спробувати інший, якщо проблема постійно з’являється.
Рішення 3: Перевстановіть звукові драйвери та оновіть їх до останньої версії
Такі проблеми з мікрофоном досить часто спричинені драйверами звукових пристроїв, і вам слід подумати про їх оновлення, особливо якщо ви цього не робили давно. Таким чином, ви можете видалити поточні драйвери, які можуть спричинити цю проблему, та встановити нові, нові драйвери, які не можуть спричинити появу цієї помилки. Обов’язково виконайте наведені нижче дії!
- Перш за все, вам потрібно буде відкрити диспетчер пристроїв . Натисніть клавішу Windows і клавіші R одночасно і введіть “ devmgmt. msc ”у вікні, яке з’явиться для відкриття Диспетчера пристроїв.
- Ви також можете шукати диспетчер пристроїв, натиснувши кнопку меню « Пуск » у нижній лівій частині екрана, клавішу Windows або клавішу пошуку / Кортани Просто введіть « Диспетчер пристроїв » після цього та клацніть лівою кнопкою миші перший результат.

- Після цього розгорніть розділ « Контролери звуку, відео та ігор» , клацніть правою кнопкою миші основний аудіопристрій та виберіть у контекстному меню пункт « Видалити пристрій» . Також переконайтеся, що ви підтвердили будь-які підказки з проханням підтвердити свій вибір.

- Тепер ви можете відвідати веб-сайт виробника та шукати драйвери вручну. Введіть необхідні дані про свій комп’ютер та операційну систему та завантажте найновіший драйвер. Запустіть інсталятор на своєму комп’ютері, дотримуйтесь інструкцій на екрані, і все.
- Крім того, ви можете просто натиснути параметр « Дія» у рядку меню у верхній частині вікна та вибрати опцію « Сканувати зміни в апаратному забезпеченні» . З’ясується, що ви видалили драйвер, і останній, знайдений Windows, буде встановлений автоматично.

- Повторно відкрийте Rainbow Six Siege і перевірте, чи не запрацював голосовий чат!
Рішення 4. Оновіть Windows до останньої версії
Що стосується оновлення Windows, є плюси і мінуси. Це часто ламає стільки речей, скільки вдається виправити. У цьому сценарії частинок Windows Update розглядається як рятівник, оскільки багато користувачів змогли вирішити проблему, просто завантаживши та встановивши найновіші оновлення для Windows 10. Переконайтеся, що ви виконали наведені нижче дії, щоб зробити те саме, і, сподіваємось, вирішити проблему. проблема.
- Відкрийте " Налаштування" , натиснувши кнопку меню "Пуск" і клацнувши піктограму гвинтика в нижньому лівому куті. Крім того, ви можете просто шукати Налаштування в меню «Пуск» або використовувати комбінацію клавіш Windows + I.

- Усередині програми Налаштування натисніть, щоб відкрити Оновлення та безпека Переконайтеся, що ви перебуваєте на вкладці Windows Update . Якщо всередині оновлень не відображається, натисніть кнопку Перевірити наявність оновлень, щоб шукати більше.
- Якщо є оновлення, готові до встановлення, або якщо пошук із кроку 2 знаходить нову версію Windows для оновлення, її опис повинен бути доступний нижче разом із Завантажити та встановити зараз

- Клацніть на цю кнопку і зачекайте, поки Windows завершить завантаження та встановлення оновлення. Ймовірно, вам доведеться перезавантажити комп’ютер, щоб завершити завантаження. Перевірте, чи проблема вирішена згодом!
Рішення 5: Видаліть Asus Sonic Studio
If you are an Asus user and if you have this program installed on your computer, you should consider uninstalling it. It’s an audio manager for Asus devices and many users have reported voice chat problems with Rainbow Six Siege with this program installed. Follow the instructions below to uninstall it completely!
Windows 10:
- Open Settings by clicking the Start menu button and click the cog icon in the bottom left corner. Alternatively, you can simply search for Settings in the Start menu or use the Windows Key + I key combination.

- Once inside, click to open the Apps section which should immediately list all programs you have installed on your computer. Locate the Asus Sonic Studio entry in the list, left-click its entry once, and select the Uninstall button which will appear.
- Follow the instructions which will appear on the screen in order to complete the uninstallation wizard.
Other versions of Windows:
- On other Windows versions, you can use the Win Key + R key combination to open the Run dialog box. Inside the box, type “control.exe” and click the OK button to open the Control Panel. Even more easily, you can simply search for Control Panel with the Start menu open.

- Once inside Control Panel, change the View by option to Category at the top right part of your screen. Click the Uninstall a program button under the Programs section in Control Panel.

- Locate Asus Sonic Studio in the list of installed programs on your computer, left-click to select it, and click the Uninstall button from the menu above. You can also right-click its entry and choose Uninstall from the context menu which will appear.
- Once again, follow the instructions on-screen to uninstall it and check to see if voice chat has started working while playing Rainbow Six Siege.
Solution 6: Edit the Configuration File
If you are unable to resolve the problem in-game or by any of the methods we have presented above, there is an easy way to attempt a solution by simply editing a configuration file located in your Documents folder. This should reset the voice chat capture mode and you should be good to go. Make sure you follow the instructions below carefully!
- Make sure the game is closed before proceeding! Locate the This PC entry on your Desktop and double-click to open it. Alternatively, you can simply open a folder on your computer and left-click This PC from the navigation menu at the left side of the folder window.

- Anyway, under the Devices and drives section inside This PC, make sure you double click your Local Disk (C:) Navigate to Users >> YourUserName >> Documents >> My Games >> Rainbow Six – Siege.
- Once inside the Rainbow Six – Siege folder, make sure you open the folder named like your UplayID. It might be a seemingly random string of letters and numbers if you haven’t set up your ID properly. Open this folder.

- Inside this folder, right-click the GameSettings configuration file and choose to open it with a text editor such as Notepad. Other text editors are okay as well.
- After opening it, use the Ctrl + F key combination to open the Find You can also click Edit from the menu bar at the top of the window and choose Find from the menu which will appear.

- In the Find what text box, make sure you type “VoiceChatCaptureMode”. Change the number next to this option to 1. Use the Ctrl + S key combination to save the changes or click File >> Save. Reopen the game and check to see if the same problem still appears!
Solution 7: Decrease the Voice Chat Record Threshold
This is a simple in-game setting which was driving players mad for a long time. Basically, if the threshold is set too high, you won’t be able to use voice chat properly. All you need to do to resolve the problem is to decrease the voice chat record threshold by following the steps we have prepared below.
- Open the game by double-clicking its icon on the Desktop. If it’s installed via Steam, open your Steam client from the Desktop or by searching for it in the Start menu or the Search/Cortana window and left-click the first result which will appear.

- Once the Steam client opens, click the Library button from the top of the window, right-click the Rainbow Six Siege entry in the list of games you have installed, and choose Play Game from the context menu which appears.
- Once the game’s home screen appears, click the cogs icon at the top right part of the screen and choose Options from the dropdown menu.

- Navigate to the Audio tab inside the options section and look for the Voice Chat Record Threshold Make sure you decrease it from its high value to something around 20. Click the Apply button below and check to see if voice chat has started working properly!
Solution 8: Use Cloudflare’s DNS Address
Changing the default DNS address your computer uses to connect to the Internet with the free one provided by Cloudflare can resolve the voice chat issue with the game. Many users have benefitted from this method and you can easily be one of them if you follow the instructions below!
- Use the Windows Key + R key combination to open the Run dialog box. Type “ncpa.cpl” inside the bow without the quotation marks and click OK.

- Alternatively, you can search for Control Panel in the Start menu and left-click the first result. Change the View by option inside Control Panel to Category and click the Network and Internet section to open it.
- Once inside, click to open the Network and Sharing Center. From the left-side menu, choose the Change adapter settings

- Anyway, right-click the network adapter you use to connect to the Internet and choose Properties from the context menu which will appear.
- Locate the Internet Protocol Version 4 (TCP/IPv4) entry in the “This connection uses the following items” list, left-click to select it, and click the Properties button below.

- Change the second radio button to Use the following DNS server addresses. Set the Preferred DNS server to 1.1.1.1 and the Alternate DNS server to 1.0.0.1 and check the Validate settings upon exit box.

- Apply the changes you have made by clicking the OK button and check to see if voice chat has started working properly!
Solution 9: Enabling Stereo Mix
In some cases, the stereo mix feature from the recording panel might be disabled due to which this error is being encountered. Therefore, in this step, first, we will enable the stereo mix and then change the recording quality of the microphone to work more smoothly with the game. For that:
- Navigate to your desktop and right-click on the “Speaker” icon on the bottom right of the system tray.
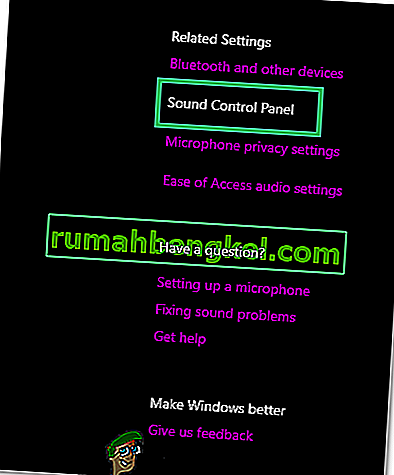
- Select “Open Sound Settings” and then click on the “Sound Control Panel” button.
- Once in the sound control panel, click on the “Recording Tab” and in this tab, right-click on the “Stereo Mix” option and select “Enable”.
- Now right-click on your microphone in the recording tab and select “Properties”.
- Go to “Advanced’ and click on the “Quality” dropdown.
- From here, select the very first option in the list and then start the game. Start going downwards across the list one by one until you find one that fixes the error.
- Check to see if the issue persists.


Solution 10: Configuring Microphone Privacy
In some cases, the Microphone privacy settings might be preventing it from working during the gameplay. Therefore, in this step, we will be changing some WIndows’ Privacy settings in order to allow the recording of your voice. For that:
- Press “Windows” + “I” to open the settings.
- Click on “Privacy” and then select “Microphone” from the left pane.
- Click on the “Allows Apps to Access Microphone” toggle and then scroll down to allow apps to access your microphone.
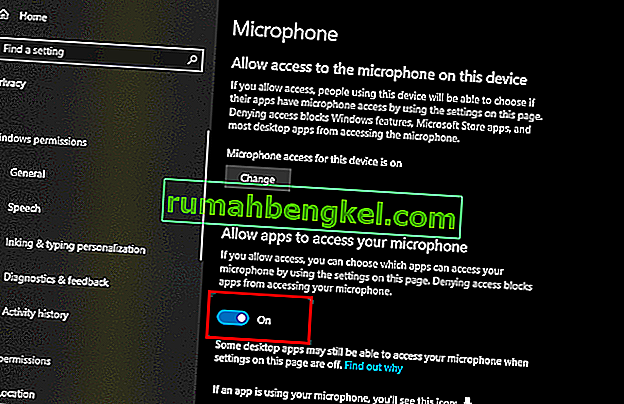
- Turn ON the toggle in front of individual apps as well which you intend to use for VOIP.
- Check to see if the issue persists.

If the issue still persists and you are all that determined to get it fixed, the only workaround left is to perform a reinstall of Windows and check if that fixes your issue.