Хмара Steam забезпечує простий і прозорий спосіб збереження ваших ігрових даних на віддаленій системі зберігання. Файли, зазначені в конфігурації Auto-Cloud, або якщо вони записані на диск, автоматично копіюються на хмарні сервери Steam (за допомогою Cloud API) після існування гри.

Це особливо корисно, якщо користувач змінює свій комп'ютер. Хід гри буде відновлено або за допомогою Cloud API, або зчитуванням безпосередньо з диска. Файли будуть автоматично завантажені перед запуском гри, оскільки ви вже ввели свої облікові дані Steam. Основна робота Steam Cloud - забезпечити синхронізацію всіх файлів на всіх комп’ютерах, якими користується користувач.
Користувачі мають можливість вимкнути всю синхронізацію хмари, присутню в налаштуваннях Steam у клієнті. Користувачі також мають можливість вимкнути хмарну синхронізацію на гру. Але перед тим, як переходити до рішень, оновіть клієнт Steam до останньої версії.
Які існують різні методи використання хмари Steam?
Steam пропонує два різні методи використання Steam Cloud.
Спочатку API Steam Cloud. Cloud API надає ряд функцій, які дозволяють безпосередньо інтегрувати Steam Cloud у вашу гру. Cloud API також виконує завдання ізоляції окремих файлів користувачів Steam один від одного, а також забезпечує кращий контроль над Steam Cloud в цілому.
Другий - Steam Auto-Cloud. Ця функція в першу чергу була розроблена для застарілих ігор, де важко було використовувати Cloud Cloud. Це швидкий спосіб розпочати роботу з Steam Cloud, але йому не вистачає гнучкості та потужності, яку надає API Steam Cloud.
Розробники рекомендують використовувати Cloud API замість Steam Auto-Cloud, оскільки він забезпечує більш глибоку та ефективну інтеграцію та налаштування. Це дозволяє отримати максимальну віддачу від хмари Steam.
Як вирішити конфлікт у хмарі Steam?
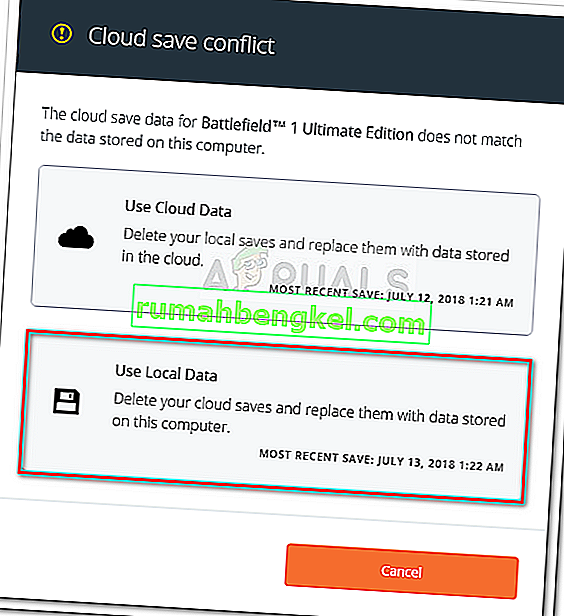
Конфлікт Steam Cloud виникає, коли вміст Steam Cloud не збігається з локальними файлами гри, що зберігаються на жорсткому диску. Це може статися на машині, якою ви користувались у той час, або це могло статися раніше на іншій машині. Оскільки файл було змінено у двох різних місцях без синхронізації між ними, Steam не може визначити, який файл зберігати.

Швидше за все, ви оберете файл, який було нещодавно змінено. Це означає, що останні події у вашій грі будуть збережені. Слід уважно перевірити дані, попередньо переглянуті у вікні. Уважно перегляньте дату та час контексту та відповідайте цьому останньому разу, коли ви грали в гру в Steam. Цей контекст може допомогти вам визначити, яку версію зберігати.
Зверніть увагу, що гра в ігри в автономному режимі не дозволить синхронізувати ваші ігри, і це є найбільш вірогідною причиною конфлікту Steam Cloud.
Що робити, якщо Steam не може синхронізувати файли з хмарою?
Ця помилка вказує на те, що Steam не може синхронізувати ваші локальні файли з Steam Cloud. Це може бути тимчасовою проблемою, з якою можуть зіткнутися сервери Steam Cloud. Ви можете перевірити стан Steam Cloud на веб-сайті Steam, щоб переконатися, що проблема на їх стороні.

Якщо хмарний сервіс Steam працює і працює бездоганно, це означає, що проблема закінчена. Ви можете перевірити підключення Steam та вирішити проблеми. Ви також можете перевірити, чи лише у вас виникають проблеми із синхронізацією із Steam Cloud.
Якщо проігнорувати повідомлення та натиснути кнопку «Грати в гру», це може спричинити потенційний конфлікт між локальними файлами та хмарою Steam. Це також може призвести до втрати прогресу та даних гри.
Що робити, якщо я втрачу файл або прогрес після переходу на інший комп’ютер?
Якщо вам не вистачає вашого останнього прогресу та перевірте, чи гра використовує хмару Steam, скориставшись налаштуваннями, це означає, що Steam не змогла успішно синхронізувати ваші дані, або синхронізація призвела до завантаження ваших попередніх даних до Хмара
Можливо, ваш оригінальний файл або прогрес все ще перебуває на старій машині і не вдалося синхронізувати. Можливо, якщо ви запустите Steam на цьому комп’ютері, ваш прогрес покаже. Якщо це станеться, він буде автоматично оновлений на всіх інших машинах, пов’язаних з вашим обліковим записом Steam.
Крім того, багато ігор не використовують можливості Steam Cloud. Ви можете перевірити офіційну сторінку гри, якщо доступна підтримка Steam Cloud. Якщо це не так, і ви не маєте доступу до старішої машини, це означає, що ваш прогрес втрачено, і його неможливо відновити.
Як видалити файли, що зберігаються на серверах Steam Cloud?
Хмара Steam використовується для резервного копіювання кожного прогресу вашої гри, щоб ви не втратили свій прогрес, якщо отримаєте доступ до гри з будь-якого іншого комп’ютера. Ви можете підтвердити, що хід зберігається у хмарі, використовуючи такий спосіб.
Перевірте, чи зберігається ваша гра.
- Відкрийте клієнт Steam . Відкрийте його Налаштування , натиснувши кнопку Steam, яка знаходиться у верхньому лівому куті вікна, і виберіть опцію.
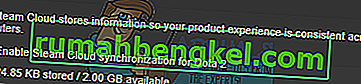
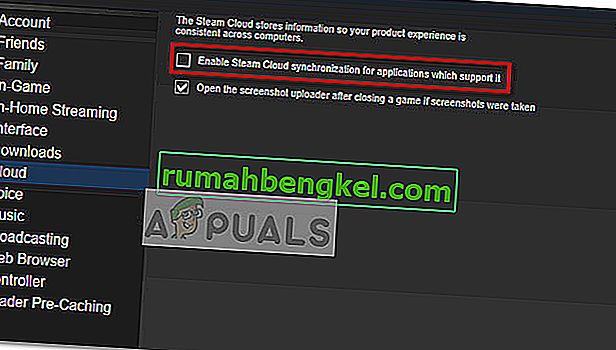
- Відкрийте вкладку Хмара в лівій частині екрана. Перевірте, чи встановлено прапорець « Увімкнути синхронізацію Steam Cloud для програм, які її підтримують ».
- Потім натисніть на вкладку Бібліотека, яка знаходиться у верхній частині клієнта Steam. Тут будуть перелічені всі ваші ігри.
- Клацніть правою кнопкою миші на грі та виберіть Властивості . Потім перейдіть на вкладку « Оновлення », яка знаходиться у верхній частині вікна.
- У нижній частині вікна ви побачите опцію « Увімкнути синхронізацію Steam Cloud для [імені гри] ». Переконайтеся , що параметр перевіряється .


Якщо ви ввімкнули обидва параметри, це означає, що ваша гра резервно копіюється хмарою Steam, і ми також можемо видаляти дані.
Що таке механізм резервного копіювання?
Перше, що ви повинні знати, це те, що збережено три версії даних гри
- Оригінальна версія зберігається в папці AppData ( D1 ).
- Хмарна версія зберігається в папці Steam / userdata / SteamID / AppID ( D2 ).
- Хмарна версія, що зберігається на хмарних серверах Steam ( D3 ).
Зверніть увагу на анотації (D1, D2, D3), які ми використовували, оскільки в майбутньому ми будемо до них багато посилатися.
Коли ви починаєте гру вперше, D1 створюється автоматично. Після того, як ви закінчите гру, дані гри оновлюються в D1 і автоматично копіюються в D2. Після цього D2 синхронізується з D3, таким чином завантажуючи весь вміст вашої гри.
Якщо ви запускаєте гру з іншого комп'ютера вперше, якщо Steam має D3 на своїх серверах, але не виявляє D2 на комп'ютері, він автоматично завантажить дані та скопіює D3 в D2. Steam Cloud також автоматично завантажує відсутні дані при кожному запуску Steam.
У двох словах, найважливішими даними для нас є D2. Якщо ми можемо цим керувати, ми можемо успішно видалити дані, які ви хочете видалити.
Примітка: У деяких іграх немає D1, і вони безпосередньо зберігають свої дані в D2. Хоча деякі ігри не використовують D2 як засіб і завантажують дані в хмару безпосередньо з D1.
Який вміст даних користувача?
У каталозі Steam / userdata у вас повинна бути папка, що відповідає вашому SteamID (Ви перевіряєте, який ваш Steam ID, прочитавши нашу статтю про нього). Після того, як ви його відкриєте, будуть створені папки для кожної гри, в яку ви граєте. Вони будуть ідентифіковані за допомогою їх AppID (AppID можна легко перевірити, відвідавши гру у магазині Steam та витягнувши її з URL-адреси). У цій ігровій папці ви знайдете дві сутності.
- remotecache.vdf: Цей файл описує всі властивості файлів, що містяться у віддаленій папці.
- Віддалена папка . Тут містяться всі файли, які синхронізуються з вашим сервером Steam Cloud.
Видалення даних із хмари
In this method, we will be following two important steps. We will first bring up the Steam Cloud conflict notification and then delete the Cloud files.
Do note that you would have to follow these steps game by game to delete all of the Steam cloud content.
First, we need to delete the AppID folder from your Steam directory. After you restart your computer and Steam, Steam will automatically re-create the folder. We need to perform this step to ensure that the Steam Cloud is working perfectly and we can go ahead with the part of deletion.
- Open your Steam directory. The default location for your Steam installation is
C:\Program Files (x86)\Steam
- Search for a folder of AppID and Delete it. Then restart your computer and Steam. Start a game for a few minutes. Make sure that you have a working internet connection.
- Navigate back to the Steam directory and check if the AppID folder is back. If it is, it is confirmed that your Steam Cloud is working perfectly and we can proceed with the method.
Bringing Up Steam Cloud Conflict Dialogue
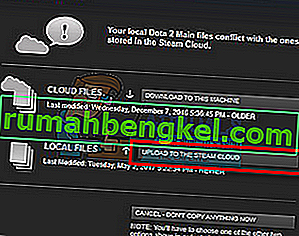
The first part of the solution is probably the most difficult. To delete all your Steam Cloud data, it is necessary to bring the conflict dialogue. Without it is not possible to delete the data present in your Cloud. Steam Cloud conflict occurs when the Cloud files differ from the data present on your hard drive.
There are two methods to bring about this conflict:
Method 1:
- Make sure that your Steam Cloud is enabled by following the steps mentioned above. Exit Steam completely by ending all the processes starting with Steamclientbootstrapper using the task manager.
- Now will alter all the files in the location
Steam\userdata\SteamID\AppID\remote
The objective is to make sure that all the files are different from those uploaded to the Steam cloud. We can’t simply delete the files from this location as Steam will automatically notice that the files are missing and download the same ones from the Cloud servers. We can achieve our task by corrupting them and making them 0-byte files.
- Navigate to
Steam\userdata\SteamID\AppID\remote
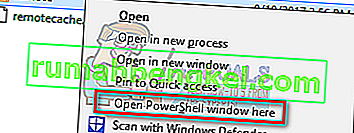
- Now hold shift and right-click on your remote folder. Select the option “Open PowerShell window here”.
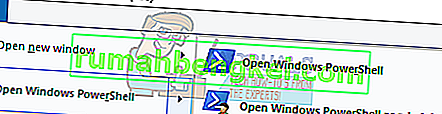
- You can also open PowerShell when in the folder by clicking the File option present at the top left side of the screen and selecting “Open Windows PowerShell as administrator”.
- Once PowerShell is opened, type the exact text written below


clc –path “C:\Program Files (x86)\Steam\userdata\SteamID\AppID\remote\*"
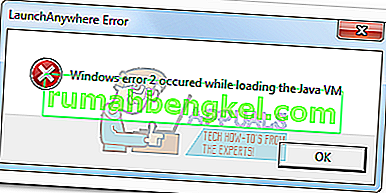
If you fail to write the correct code, you will get an error like this

If you correctly type in the line there will be no confirmatory message and you will get a window like this.

Start your Steam and there will be the conflict windows present on your Steam client.
Method 2:
This is an easier method as compared to the earlier one but it isn’t that efficient.
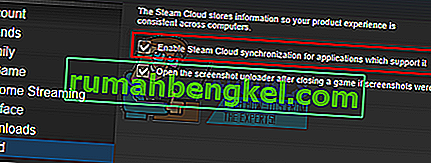
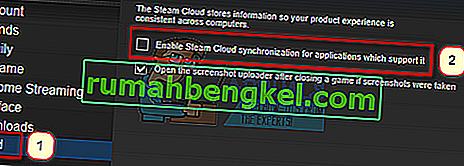
- Open your Steam client. Open its Settings by pressing the Steam button present at the top left corner of the window and selecting the option.
- Open the Cloud tab present on the left side of the screen. Uncheck the option “Enable Steam Cloud synchronization for the applications which support it”.
- Now navigate to your Stream directory as you did earlier and delete all files present in the folder of AppID. The file path for deletion is
Steam\userdata\SteamID\AppID.
- Now start the game to make new and different files in the file location.
- Exit the game and Steam completely by ending all Steam processes in the task manager (end steamclientbootstrapper first).
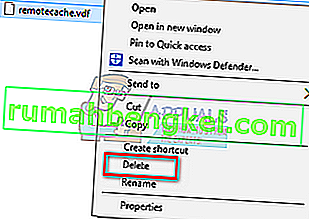
- Now delete the remotecache.vdf file present in the location
Steam\userdata\SteamID\AppID
- Start your Steam.
- Head over to the client’s Settings and enable the cloud.

Now a Steam conflict dialogue will come forth and we can proceed with the remaining method.
Deleting Cloud files
Once the Cloud conflict error is forth, don’t click any option and follow the instructions below.
- Navigate to the following file path
Steam\userdata\SteamID\AppID
and delete all the files in it. There will be two files (remote folder and remotecache.vdf). Delete both of them.
- Now go back to the conflict window and select the option of “Upload to the Steam Cloud”. Now Steam will sync your AppID folder while there will be nothing in it and the previous data on your Steam Cloud will be deleted.
- Now the game will start automatically but it will create new files that will be synced to your Steam cloud when you close it. We can prevent it from happening by pressing alt + tab. This will open the open windows on your screen. Select the Steam client from the list of windows.
- Once you are in the Steam client, open the client’s Settings. Navigate to the Cloud tab and uncheck the line which enables cloud.

- Now return to the game and exit. No files will be synced to your Steam cloud.
- Exit Steam and delete the AppID folder as we did before.


How to Make Sure If it Worked?
Remember how we checked at the beginning of this method if the Steam Cloud was running as expected by deleting the AppID folder and checking if it was made again. If there is no file present in the Steam cloud, there will be no file downloaded to your computer.
- Enable the Steam cloud as we did in the guide.
- Exit Steam completely by using the task manager.
- Delete the AppID folder (if you didn’t in step 2).
- Now check D3 (these are the cloud files) and compare them with D2 (local files on your computer). If there is nothing in D3, there will be nothing in D2 too!
- Check the following directory Steam\userdata\SteamID
No new AppID folder would have been created.
You can also check by logging Steam in on another computer and checking if the files exist.
If you make it till here without any problems, you have successfully deleted all the files on your Steam Cloud.
How to Delete Steam Cloud Saves from OS X
The procedures above can also be replicated on OS X and older Macs to a slight extent. By following the steps below, you will be able to delete your local saves. You can then disable the Steam Cloud synchronization from the Steam application, start a new game and create a few new saves. Then, when you return to re-enable the Steam Cloud synchronization features, the client will ask you which saves do you want to use. You can then choose the new ones which will delete and replace your old saves from the cloud.
To make things even clearer, here’s a step-by-step guide through the whole thing:
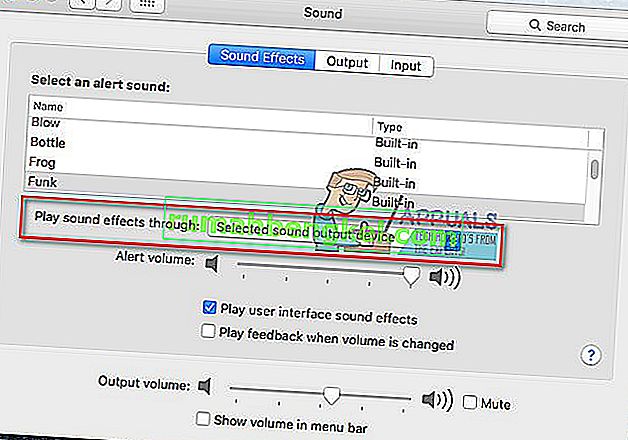
- Open your Steam application and go to Steam > Settings via the ribbon at the top of the window.
- In the settings menu, click on the Cloud tab and uncheck the box associated with Enable Steam Cloud synchronization for applications that support it.
- Close Steam completely and open your Finder app.
- Go to Library > Application Support > Steam > SteamApps > Common and open the folder of whichever game you want to delete the save files.
- Next, open the SAVE folder to reveal the saves of the game.
Note: If the location specified above doesn’t land you to the save files, try the following locations but mind the placeholders:
Users / *Your username* /Library / Application Support / *Game Folder* / Game Documents / *Game* / GameSaves Users/ *Your username* / Library / Application Support / Steam / userdata / *GameNumber* / remote Users/ *Your username* / Library / Containers / *Game Folder* / Data /Library / Application Support / *Game* / GameDocuments / *Game* / gamesaves
- Once you manage to identify and delete the local saves from the game you’re targeting, open the Game and create a few new saves.
- Exit the game, open steam and return to Steam > Settings > Cloud. From the cloud tab, re-enable the checkbox next to Enable Steam Cloud synchronization for applications which support it and click the OK button below.
- Steam will ask you whether you want to use the newly created local saves or the ones that you already have on the cloud. Choosing to use the new ones will delete the old saves that you currently have on Steam Cloud.