Багато користувачів стикаються з проблемою, коли Steam не може завантажити ваш час. Це підказує, що сервери вмісту недоступні для завантаження. Можна впевнено сказати, що ця проблема не спричинена жодною проблемою, зокрема через безліч конфігурацій користувачів. Ми перерахували деякі рішення, які включають усі методи підтримки Steam, а також користувачів.

Рішення 1: Видалення налаштувань проксі
Проксі-сервер використовується в організаціях, де відкритий доступ до Інтернету обмежений. Проксі-сервер використовується для відстеження мережі та надання альтернативного шлюзу для користувачів. Налаштування проксі часто стають перешкодою, коли Steam намагається підключитися до своїх серверів для завантаження.
Існує два способи вимкнути проксі-сервер на комп’ютері.
Спосіб 1: Chrome
- Відкрийте браузер Chrome і натисніть меню Chrome (угорі праворуч) при відкритті.

- Після появи спадного меню натисніть Налаштування .

- Після відкриття сторінки налаштувань введіть “ proxy ” у діалоговій панелі, розташованій угорі.

- З результатів пошуку виберіть результат із написом « відкрити налаштування проксі ».

- Коли налаштування відкриються, натисніть на “ Налаштування локальної мережі ” на вкладці “З’єднання”, яка знаходиться внизу.

- Зніміть прапорець " Автоматично визначати налаштування ". Збережіть зміни та вийдіть. Перезапустіть Steam.

Спосіб 2: Через налаштування мережі
- Натисніть кнопку Windows + R, щоб відкрити програму Run.
- У діалоговому вікні введіть “inetcpl. cpl ”.

- Властивості Інтернету відкриються. Перейдіть на вкладку Підключення та натисніть на налаштування локальної мережі.
- Опинившись у налаштуваннях локальної мережі, зніміть прапорець " Автоматично визначати налаштування" . Збережіть зміни та вийдіть для повторного запуску Steam.
Рішення 2. Вимкнення розширень Chrome
Іноді розширення, присутні в Chrome, можуть створити справжню перешкоду. Вони заважають налаштуванням вашої мережі, особливо надбудові з назвою “ Ghostery ”. Він відстежує вашу мережу та надає статистичні дані про те, де ви залишаєте свій цифровий слід. Це навіть дає вам можливість контролювати, які веб-сайти можуть отримати доступ до ваших даних, які не можуть. Радимо вимкнути ці доповнення з Chrome перед тим, як продовжувати завантаження. Якби проблема була спричинена ними, вона була б вирішена.
Сюди не входять лише розширення Chrome, вам слід вимкнути БУДЬ-ЯКУ програму, пов’язану з вашою мережею (монітор даних, VPN тощо). Краще спробувати, а не продовжувати подальші рішення, які є більш складними.

Рішення 3: Зміна регіону завантаження
Одне з основних виправлень включає зміну регіону завантаження.
Система вмісту Steam розділена на різні регіони. Клієнт автоматично визначає ваш регіон через вашу мережу та встановлює його за замовчуванням. Іноді сервери в певному регіоні можуть бути перевантажені або зазнати відмови обладнання. Таким чином, зміна регіону завантаження може вирішити проблему. Ви завжди можете спробувати змінити регіони завантаження багато разів (це не лише одна спроба), перш ніж продовжувати подальші рішення.
- Відкрийте Steam і натисніть " Налаштування " у спадному меню у верхньому лівому куті вікна.
- Виберіть " Завантаження " та перейдіть до " Завантажити регіон ".
- Виберіть інші регіони, крім вашого, і перезапустіть Steam.

Рішення 4: Видалення clientregistry.blob
Реєстр клієнтів вашого Steam може бути пошкоджений, і це може бути причиною того, що ви стикаєтеся з помилкою. Ми можемо спробувати перейменувати / видалити його.
- Повністю вийдіть із Steam і завершіть усі завдання, як зазначено у наведеному вище рішенні.
- Перейдіть до каталогу Steam. Типовим є C: \ Program Files \ Steam .
- Знайдіть ' clientregistry.blob' .

- Перейменуйте файл на ' clientregistryold.blob ' (або ви можете повністю видалити файл).
- Перезапустіть Steam і дозвольте відтворити файл.
Сподіваємось, ваш Клієнт працюватиме належним чином. Якщо це все одно не працює, виконайте наведені нижче дії.
- Поверніться до каталогу Steam.
- Знайдіть "Steamreporter". exe '.

- Запустіть програму та перезапустіть Steam.
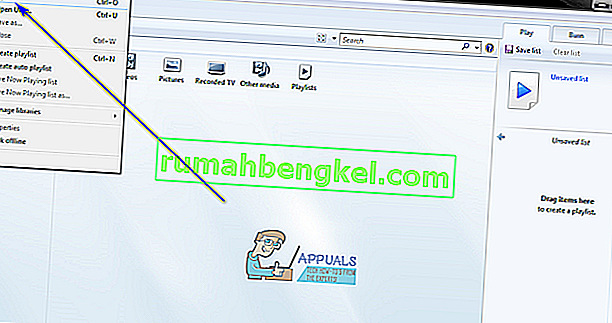
Рішення 5. Очищення черги завантаження Steam
Якщо у вашому клієнті Steam багато завантажень, що очікують на розгляд, рекомендується видалити всі, крім одного, і повторно запустити Steam.
- Відкрийте клієнт Steam на вкладці Бібліотека .
- У нижній частині ви побачите опцію, на яку можна натиснути, де написано « Завантаження призупинено ». Клацніть на ньому, щоб усі опції в черзі вийшли вперед.

- По черзі натисніть кнопку, як показано на малюнку нижче, щоб видалити елементи з черги.

- Видаливши їх, клацніть правою кнопкою миші на іграх (крім тієї, яку потрібно завантажити спочатку), щоб налаштування з’явилися. Після відкриття налаштувань натисніть кнопку « Видалити ».

- Steam запропонує підтвердити свої дії. Клацніть «Видалити», коли з’явиться запит, і перезапустіть Steam, перш ніж повторно спробувати завантажити цю гру.

Рішення 6: Використання змивної конфігурації
Ми можемо спробувати запустити команду flush config для скидання конфігурації. Виконайте наведені нижче дії.
- Натисніть Windows + R, щоб відкрити програму Run.
- На панелі діалогу введіть “ steam: // flushconfig ”.

- Натисніть OK . Тепер Steam відкриє вікно, щоб підтвердити ваші дії. Натисніть Ok і перезапустіть Steam.

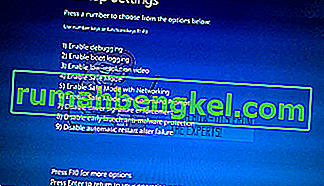
Рішення 7: Запуск Steam у безпечному режимі з мережею.
Before resorting to more technical methods, you can try running your PC in safe mode (with networking) and try to start the Steam download.
- Get your computer to safe mode by selecting from various options available. Select ‘Enable Safe Mode with Networking’. You can learn how to get your PC to safe mode from here. If you are running Windows 7, press F8 upon the startup of your PC and you will be directed to a similar window where you can select the required option.
- Open Steam and try updating/installing with it again. This method should remove all obstacles (if any) which your Steam may be experiencing.

Solution 8: Disabling Safe-web from router
Your WiFi router may have a setting called safe-web in it. What this does is filter all the incoming data it deems are not trustworthy. It is very common for it to flag Steam as one and disrupts the connection with your computer.
Since there are hundreds of different routers used by the users, it is very difficult to list the solution on how to disable the option for every one of them. Here are some guidelines so you can have an idea.
- Web Safe can be found in the parental control section on the WiFi router configuration.
- It can also be found on the Virus section or the Filtering section.
- To enter your router settings, type the IP which is associated with it (for example for some it is 192.168.1.1). You can check the required IP either by calling your modem provider or by looking at the back of the device ( even its packaging box may have details).
Solution 9: Disabling Anti-virus and Defender/firewall
Before proceeding to reinstall Steam, we can try meddling with the antivirus. Antivirus monitors each packet of your computer sends and receives. Although Steam has collaborated with most of them so they don’t give problems, sometimes they do. The solution is to disable/uninstall them and check if you are able to download then.
McAfee Antivirus:
McAfee has no way to exclude certain files from its real time scanning. The only way is to disable the antivirus entirely until the game is updated. To do this, open McAfree and select “Virus and Spyware Protection”. Here you find the option of “Real-Time Scanning”. Click that option and turn it off.

Then follow the following instruction to verify integrity of game files.
- Restart your computer and relaunch Steam.
- Head over to the library section and right click on the game which is giving you problems.
- Click on its properties and select the local files tab.
- Click the verify integrity of game files button and Steam will verify that game in a few minutes.
Hopefully, after performing the above steps, your Steam won’t give any issue.

ESET NOD32
NOD32 has the tendency to mark some application files as malicious and will most probably quarantine it. This often results in the error while updating a game. Browse to your current Steam directory and copy the address
- The default location for your steam folder should be “C:\Program Files (x86)\Steam”.
Press ⊞ Win + R button. This should pop-up the Run application.
In the dialogue box write “C:\Program Files (x86)\Steam”.

Or if you installed Steam in another directory, you can browse to that directory and you can proceed with steps mentioned below.
After copying the address open ESET NOD32 and paste the location in exclude from real time scanning.
Follow the ‘verify integrity of game files’ method listed above and you will be all good.

Kaspersky AV
Kaspersky may sometimes flag Steam as an intruder and disable it from making any changes to the hard drive. To fix this, head over to ‘threats and exclusions’. Navigate to ‘trusted zone’ and add Steam.exe as a trusted application. Remember to change the settings to Do not restrict application activity as well as Do not scan opened files.
Follow the ‘verify integrity of game files’ method listed above and restart your computer.

Windows Defender
- Click Windows button and in the search bar type “Windows defender”. Among all the options, there will be an application named “Windows Defender Security Center”. Open it.
- Upon opening, you will find a list of options available in the new window. Select the option “Virus and threat protection”.

- Upon entering the menu, navigate to Virus and Threat Protection Settings. Windows may prompt you to allow administrator access to use this feature. If so, press Yes.

- After entering the required menu, you should search the window which says “Add or remove exclusions”. Click it and you will be navigated to a menu where you can add exclusions. You can exclude folders, extensions, and even files. In this case, we will exclude the whole Steam folder which is located in the directory you downloaded it.

- Click on the option which says “Exclude a folder” and navigate to your Steam directory. The default location for your steam folder should be “C:\Program Files (x86)\Steam”. Once you reach the location select the folder and save changes.
- Restart your computer and run Steam with administrative privileges. Hopefully, your speed issue will be resolved.
Solution 10: Downloading Latest Steam Client
- The default location for your steam folder should be “C:\Program Files (x86)\Steam”.
Press ⊞ Win + R button. This should pop-up the Run application.
In the dialogue box write “C:\Program Files (x86)\Steam”.

Or if you installed Steam in another directory, you can browse to that directory and you can proceed with steps mentioned below.
- Locate the following folders:
Steam.exe (Application)SteamApps (Folder)Userdata (Folder)
- Delete all the other files/folders/applications except the ones mentioned above.
- Head over to the Steam website and download the latest Steam client. Don’t launch the old Steam.exe present in your directory at all. The problem won’t be solved.
- Install Steam using the installer in the same directory as your previous one. Hopefully, after installation, the problem will be solved.
Solution 11: Changing Default Browser
In a weird turn of events, having Chrome or any other browser set as the default browser sometimes causes issues with the download request that Steam sends to its servers. Therefore, in this step, we will be setting internet explorer as our default browser temporarily to make sure that the download proceeds. For that:
- Press “Windows’ + “I” to open settings.
- In settings, click on “Apps” and then select “Default Apps” from the left pane.
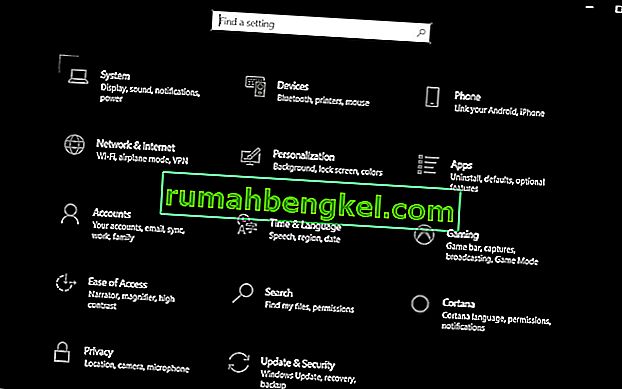
- Click on the “Web browser” option and then select “Internet Explorer” from the list.
- Open Steam and check to see if the issue persists.

Solution 12: Removing Steam Content Server Limiter
In certain cases, it was shown that uninstalling Steam Content Server Limiter from the Classical Control Panel interface fixes this issue for a lot of people. Therefore, in this step, we will be doing exactly that. For that:
- Press “Windows’ + “R” to open the Run prompt.
- Type in “Control” and press “Enter”.

- Click on the “Uninstalla Program” option and then right-click on the “Steam Content Server Limiter” and select “Uninstall”.
- After the server limiter is uninstalled, check to see if the issue persists.

Method 13: Changing DNS
In certain situations, the server DNS that the computer is using to communicate with the internet might not be compatible either with the steam servers or it might be facing issues temporarily. Therefore, in this step, we will be changing our DNS servers. For that;
- Press “Windows’ + “R” to open the Run prompt.
- Type in “ncpa.cpl” and press “enter”.

- Right-click on your network adapter and select “Properties”.
- In properties, double click on the “Internet Protocol Version 4(TCP/IPV4)” option and check the “Use following DNS Addresses” option.
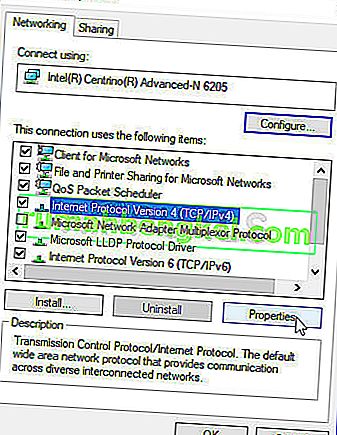
- Type in “8.8.8.8” in the primary DNS address and “8.8.4.4” in the secondary DNS address.
- Click on “OK” and then check to see if the issue persists. If it does, try using “1.1.1.1” and “1.0.0.1” in the fields respectively.


Method 14: Changing Config File
In certain situations, the config file on the computer might require some editing in order to get it some games to start working. The steps listed below are primarily for Mac but you can try them on some older OS such as Windows XP too as some users reported that this fixed it for them.
- Open the Mac Finder and navigate to the following directory.
drive_c/Program Files/Steam/config/
- Launch the “config.vdf” file and wait for it to open.
- Find the following text lines inside the file.
"InstallConfigStore" { "Software" { "Valve" { "Steam" "cip" - Paste the following lines of code under the “cip” entry in the config after creating a new line under it.
CS" "valve511.steamcontent.com;valve501.steamcontent.com;valve517.steamcontent.com;valve557.steamcontent.com;valve513.steamcontent.com;valve535.steamcontent.com;valve546.steamcontent.com;valve538.steamcontent.com;valve536.steamcontent.com;valve530.steamcontent.com;valve559.steamcontent.com;valve545.steamcontent.com;valve518.steamcontent.com;valve548.steamcontent.com;valve555.steamcontent.com;valve556.steamcontent.com;valve506.steamcontent.com;valve544.steamcontent.com;valve525.steamcontent.com;valve567.steamcontent.com;valve521.steamcontent.com;valve510.steamcontent.com;valve542.steamcontent.com;valve519.steamcontent.com;valve526.steamcontent.com;valve504.steamcontent.com;valve500.steamcontent.com;valve554.steamcontent.com;valve562.steamcontent.com;valve524.steamcontent.com;valve502.steamcontent.com;valve505.steamcontent.com;valve547.steamcontent.com;valve560.steamcontent.com;valve503.steamcontent.com;valve507.steamcontent.com;valve553.steamcontent.com;valve520.steamcontent.com;valve550.steamcontent.com;valve531.steamcontent.com;valve558.steamcontent.com;valve552.steamcontent.com;valve563.steamcontent.com;valve540.steamcontent.com;valve541.steamcontent.com;valve537.steamcontent.com;valve528.steamcontent.com;valve523.steamcontent.com;valve512.steamcontent.com;valve532.steamcontent.com;valve561.steamcontent.com;valve549.steamcontent.com;valve522.steamcontent.com;valve514.steamcontent.com;valve551.steamcontent.com;valve564.steamcontent.com;valve543.steamcontent.com;valve565.steamcontent.com;valve529.steamcontent.com;valve539.steamcontent.com;valve566.steamcontent.com;valve165.steamcontent.com;valve959.steamcontent.com;valve164.steamcontent.com;valve1611.steamcontent.com;valve1601.steamcontent.com;valve1617.steamcontent.com;valve1603.steamcontent.com;valve1602.steamcontent.com;valve1610.steamcontent.com;valve1615.steamcontent.com;valve909.steamcontent.com;valve900.steamcontent.com;valve905.steamcontent.com;valve954.steamcontent.com;valve955.steamcontent.com;valve1612.steamcontent.com;valve1607.steamcontent.com;valve1608.steamcontent.com;valve1618.steamcontent.com;valve1619.steamcontent.com;valve1606.steamcontent.com;valve1605.steamcontent.com;valve1609.steamcontent.com;valve907.steamcontent.com;valve901.steamcontent.com;valve902.steamcontent.com;valve1604.steamcontent.com;valve908.steamcontent.com;valve950.steamcontent.com;valve957.steamcontent.com;valve903.steamcontent.com;valve1614.steamcontent.com;valve904.steamcontent.com;valve952.steamcontent.com;valve1616.steamcontent.com;valve1613.steamcontent.com;valve958.steamcontent.com;valve956.steamcontent.com;valve906.steamcontent.com"
- Save your changes and check to see if the issue persists.
Note: Some users reported to fix the issue after having to deleting the CM List IP addresses in the file aswell in addition to pasting this code.